Files & Folders
Extract all files to a new folder on your hard drive (since you're reading this file, you probably already did this). You can name this folder anything you'd like, but for convenience we'll call it the "TNG" folder. Some files should extract into a subfolder called 'admin'. Others will extract into a subfolder called 'English' (or whatever language your TNG came in). Some images used with this readme file will go in the 'samples' folder. These will not be needed on your web site.
On your web site, create a folder for your TNG files, much like the one you already created on your own computer. We'll call it "genealogy," but you can name it anything you'd like. NOTE: If you want to put your genealogy files in the root folder, that's OK too. Just be careful, however, because the TNG files could overwrite other files you may already have there.
Using an FTP program or similar file transfer method, publish all TNG files NOT in a subfolder of 'TNG' to the 'genealogy' folder on your web site (remember, it doesn't have to be called 'genealogy').
Within the 'genealogy' folder on your web site, create two subfolders called 'admin' (all lower case) and 'English' (or whatever language your TNG came in).
Publish all files in the 'English' folder (or whatever language your TNG came in) on your computer to the new 'English' folder on your web site. If you want to support additional languages, create another folder for each language. For example, you could also have a 'Spanish' and/or a 'Dutch' folder. For each additional language, make a copy of the files in the English folder, then translate the text to the new language, then upload the new files to the new language folder(s). If you do not need to translate the Administration pages into another language, the only file you will need to translate is text.php. To allow visitors to change languages, you will also need to use the Administration page to set up records for those languages. NOTE: If you do not plan on using an 'English' folder, you will have to manually edit the config.php file and change the language name there before continuing. Otherwise, no text will be visible.
One more note concerning other languages: If you are using a language other than English, you may want to edit the file 'datelib.php' in the admin folder. This file handles the conversion of text dates to true dates. Near the top of that file you'll find a list of all month names, plus "BEF" (before) and "AFT" (after). Add to or translate the entries you see there in order to convert dates in your language.
Publish all files in the 'admin' folder on your computer to the new 'admin' folder on your web site.
Permissions & Settings
Within your 'genealogy' folder, make genlog.txt, config.php, importconfig.php, logconfig.php and pedconfig.php writeable (use chmod 666). That might look like the diagram below (read=4, write=2, execute=1 — that's where the chmod numbers come from). You can try to accomplish this by calling the TNG script "setpermissions1.php" in your browser (ie, http://yoursite/genealogy/setpermissions1.php). If you don't own the machine where your web site resides, however, this may not work for you. If that is the case, use your FTP program to set the permissions.

Within your 'admin' folder, make genlog.txt (a different file than in the last step) writeable in the same way. If you were successful running setpermissions1.php in the previous step, you may try the admin script "setpermissions2.php" (http://yoursite/genealogy/admin/setpermissions2.php) to accomplish this step.
If you are not your own site administrator (you're using a hosting provider), you can skip this step. Otherwise, please make sure that your php.ini file contains the following settings: short_open_tag = ON, file_uploads = ON, and error_reporting = 2039 (or any value not including E_NOTICE, as in "E_ALL & ~E_NOTICE"). If you can find a line in php.ini referencing the value "LimitRequestBody" then comment it out or delete it, as this will prevent you from uploading files larger than the size indicated on that line (sometimes this value is located in the php.conf file, so look for it there if you don't find it in php.ini). Also, if your PHP installation is on a Windows machine, you must change the session.save_path variable to point to your Windows temporary folder (i.e., C:\Temp). If you make changes to your php.ini file, you must restart your PHP service before the changes take effect.
Open your web browser and go to http://yoursite/genealogy/admin/index.php. From there go to Setup & Configuration and click on "General Settings."
Edit the settings to reflect your web site's file layout, your mySQL database, and other configurables. Click on the Help link at the top of the page for explanations of anything you see there. NOTE on the Root Path setting: The value you see here the first time should be the correct value, so you shouldn't have to tamper with this. If you do, you can retrieve the original value by blanking out the value and saving the page. You must then return to the Settings page and save it again. NOTE on the Language setting: If the "English" language folder you created above began with an uppercase "E", be sure to enter the word "English" in exactly the same way here.
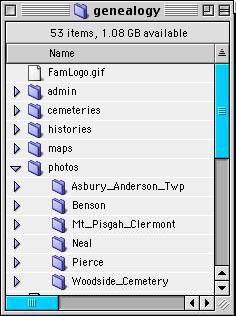
Within the 'genealogy' folder on your web site, create folders for your photos, histories and headstones (if you plan to use these features). You can attempt to create these
folders from the General Settings page by clicking on the "Make Folder" buttons for each folder, but if you do not own the hardware where you site resides, you may not be allowed
to do this and will have to use your FTP program to create the folders as you did earlier with 'admin' and 'English'. If you wish to further subdivide those folders (i.e., by
surname), create those subfolders now as well. Here's an example of what your folder structure might look like, including optional subfolders:
Also create two more subfolders of 'genealogy' called 'backups' (for use later in backing up your database) and 'gendex' (if you plan to submit your data to GENDEX).
Make ALL the subfolders created in the previous two steps owner-writeable (chmod 755, if you're using Unix/Linux commands; some systems may require 777). If the "Make Folder" buttons
worked for you above, you won't have to do this. Otherwise, here's an example of the properties box you might
see (NOTE: box shows 777 properties):

Again from the setup page, select "Configuration/Pedigree Settings" to set up all pedigree chart variables. Edit the settings to reflect your web site's overall style as well as your data. An extensive help file is accessible from this page to explain all options found there. You only need to do this if you don't like the current way pedigree charts are displayed, and you don't have to do it now.
And also from the setup page, select "Configuration/Log Settings" to set up all log-related variables and "Configuration/Import Settings to set up all import-related variables. Remember to read the corresponding Help screen for information about anything on these pages. While here, create one more subfolder of "genealogy" called 'gedcom' (for the GEDCOM files you import or export) and give it 777 permissions as well. Make sure the name you give it matches the name in the Import Settings. If you are planning to import a GEDCOM file that contains links to photos and/or histories, pay special attention to the fields labeled Local Photo and Local History paths. See the Help on that page for more information.
Next (also from the setup page), select "Create Tables" to set up the database tables. You will see a message indicating whether the operation was successful or unsuccessful. If the operation did not succeed, the script is not communicating with the database. Please go back into the general configuration settings and check the database options again. NOTE: You must set up your mySQL database before you can proceed with this step. Your host provider can help you with this. If you are acting as your own webmaster, be sure to also add a user to your database.
Your Data
Now you should set up any custom or non-standard events or attributes you'll be using. First go to the Administration page (admin/index.php). Click on People, then act like you're adding a new person by clicking Continue near the top of the page. That will allow you to see which fields are standard for individuals. Next, back up and do the same for Families to see which fields are standard there. Finally, back up to the Administration page and choose Custom Event Types.
Create a new Individual or Family Event Type for each custom or non-standard Event Type you plan to use. For each Event Type, the Tag will be the event tag. In other words, this is the text that appears next to the number 1 on a GEDCOM line (i.e., "1 OCCU", "1 EDUC" or "1 _FA3"). Custom events (as defined by desktop genealogy systems), always have the tag "EVEN". In those cases, look for a subsequent GEDCOM line that starts "2 TYPE". The text immediately following goes in the "Type/Description" field. This field should only be filled in for "EVEN" tags. You may set up an unlimited number of "EVEN" tags, as long as they have different Types. Next to "On Import" on the "New Event Type" screen, make sure you select "Accept" to have the data for this event accepted on import and displayed. Even if you plan to enter your data manually, choose "Accept." On the other hand, if you have any Event Types in your GEDCOM file that you wish to ignore (ie, maybe you don't want "REFN" to show up), create Event Types for those anyway and choose "Ignore." You can change these settings at any time, but adding new Event Types might require you to re-import your data. Data for all GEDCOM events not covered as "standard" in this application or created here by you will be ignored. However, an Event Type will be created for those events (and the flag set to "Ignore").
NOTE: An easy way to set up all your Custom Event Types is to skip this step until after you've imported your data for the first time. TNG will set up all Custom Event Types included in your GEDCOM file but will set them to be ignored. Simply change any types you want to keep from "Ignore" to "Accept" and run your import again.
Now go back to the Administration page and click on Trees. We're almost ready to input some actual data, but before we do that we need to create a Tree. Click on the Continue... button under Add New Tree and enter the information for a new tree. The first two fields are required, but everything else is optional (see the Help link on the Trees page for more information). Most people will only need to create one tree, but if you're planning on maintaining more than one independent GEDCOM, you will need to create a new tree for each.
If you are not planning on importing any data from a GEDCOM file, skip this step. Otherwise, go back to the administration page and click on Data Import to import your GEDCOM file. This must be in standard 5.5 or 4.0 format. Please read the Help file linked to from this page for detailed information about all import options. If you are using multibyte characters in any part of your file (i.e., characters you can't find on a standard Western keyboard), you should also be careful to use the ANSI character set when creating your file. If you are using Family Tree Maker to create your GEDCOM, be sure that the file is NOT indented. When you are ready to begin the import, click on the Import Data button at the bottom.
If your GEDCOM file is large and fails to import, your site may have a limit on the size of uploaded files. If you cannot resolve this with your site administrator, load the GEDCOM file to the admin folder on your site using FTP (NOTE: The file must be in the gedcom folder, and you must use ASCII mode to transfer this file). Then proceed to import the file, leaving the first field blank (see the Help on that page for more details). If the import begins but fails before you see the "Finished" message, your web server may be killing the import to save resources for other processes. If this happens, return to the Configuration General Settings (see above) and check the box labeled Save Import State before trying your import again. This time you will see a link at the top of the page that says, "If Import fails, click here to resume." Click on that link and the import will begin again at the point it failed. You might have to click this link multiple times, depending on how large your file is.
If you are planning to enter your data manually, Choose People, Families or Sources to get started. Everything should be fairly self-explanatory, but all pages have associated help files you can use if you need them.
Back on the Administration page under Secondary Processes, create a GENDEX file (if desired) and trace the lines of descent within your genealogy (this places a small mark next to children in a family group who have offspring of their own, allowing users to more easily follow your lines of descent). Note on GENDEX: You will have to register the location of your GENDEX file with the GENDEX site before your data can be indexed by GENDEX. When you register, the URL prefix will be "http://yourdomain/genealogy/getperson.php?personID=" (no quotes).
Now it's time to add users. A "user" can be one person or many people who have the same rights. To add users, go back to the Administration page and click on Users. You may add as many users as you like, but the first user you add MUST be an administrator (that's you). An administrator must have all possible rights (LDS is optional) and not be assigned to any one tree. If you do not create an administrator first, you may have trouble getting back here! Again, see the Help on this page for more information.
If you will not be setting up any users, I highly recommend that you password-protect the admin folder! If you don't, it's possible that a hacker could use the pages there to damage or erase your data. Most hosting providers allow you to do this via a web-based control panel. If you don't have access to such a control panel, ask your hosting provider how to password-protect a folder. I will likely involve creating an .htaccess file. If you are unable to complete this step now, or if you don't wish to protect this folder, you can proceed to the next step. Assuming you do succeed in protecting this directory, please write down your username and password and keep them handy.
NOTE: If you do not have any users set up and you enter the Admin area, TNG will consider you "logged in", and you will have access to data for living individuals through the public area until you close your browser.
Use the administration pages to re-import data if necessary, and to add and manage photos, histories, headstones, reports and cemeteries as needed. See the Help on those pages for more information. NOTE: The "auto thumbnail" feature will only be available to you if your server supports the GD image library. If your server does not support this, you will be required to create your own thumbnail images.
If your GEDCOM included photo and document links, you will also need to upload the actual files manually. Be sure to preserve any existing file structure under your Local Photo and Local History paths.
To add a small photo for display on a pedigree chart and at the top of the individual-related pages, first add at least one photo and thumbnail for that individual. While adding the photo and thumbnail (or later while editing the photo), check the box labeled "Make Default" for that individual (you can do more than one at a time if you're linking the photo to multiple individuals).
Customizing Your TNG Pages
To make system-wide changes to TNG's look and feel, open genstyle.css in a text or HTML editor, make, the changes, and save the file. This is entirely optional. If you make no changes, you'll get the default color and font schemes (navy & light blue). You can also try the alternate style sheet (red & khaki) by renaming genstyle2.css to genstyle.css (backup the original first). If you don't like those, you can always repeat this step at a later time and upload the file again. For more information on style sheets, see http://www.htmlhelp.com/reference/css/
Open meta.html, topmenu.html and footer.html in your text or HTML editor and customize them as needed. The first file (meta.html) is used in the head section of every page (in case you have Javascript, other style sheets, etc. that you want to include on the page). To start with, it contains only a reference to the default style sheet. The next file (topmenu.html) will be included at the top of every page generated by TNG, so you might want to include your site name and/or logo, plus a menu or other navigation scheme. It also includes the <BODY> tag. The following is one example of what you might do in this space:
 |
|
The last file (footer.html) appears at the bottom of every page. It does NOT include the </BODY> tag (intentional). I would ask that you leave the line crediting me as the author. Once again, you can always return to this step at a later time if you're not sure what you want here yet. NOTE: You may substitute other files (for example, if you wanted to use PHP code in your header, it would have to be named topmenu.php), but you must enter the new names in the appropriate fields in the General Settings (see below).
Open index.php in your text or HTML editor and customize it as needed. Pay special attention to the notes at the bottom (best viewable in a browser). This is your default home page. You may rename it, but if you do you will also need to indicate the new name in the General Settings. If you are planning to use TNG as a Nuke module, you will want to use the version of this file that comes with the TNG Nuke Add-on instead.
Open admin/adminmeta.php in your text or HTML editor and customize it as needed. This file serves the same purpose as meta.html, but for the Admin area. To start with, it contains only a reference to the default style sheet and instructions to keep search engines from indexing the Admin pages.